Please Note: The featured product in this video and blog post, Smartphone Microscope, has been discontinued. Please reference our related products below.
Related Products
Turn Your Mobile Phone into a Mobile Microscope
Can the new Cell Phone Magnifier unlock why Mint Mentos are better than Fruit Mentos for making soda explode? Check out this cheap option for those times when high-powered microscopes aren't necessary.
Arbor Scientific has a marvelous Cell Phone Magnifier that can easily be attached to a cell phone camera and turn it into a microscope.
You can use it anywhere you want, any time you want; for example you can investigate something on your nature walks that would be interesting microscopically such as an insect or plant. But I have found a lot of use for it in my lab when I view or photograph something microscopic. In this article I will provide some examples of interesting objects to view and discuss some details of the physics of the lens.
Examples of Interesting Objects
For starters, here is the surface of an ordinary piece of printer paper. This shows quite easily that it is not smooth at all. This is important for explaining why paper does not reflect light the same way a mirror does (diffuse vs. specular reflection).
Paper.
The mint-flavored Mentos have a pitted surface. These little holes act as nucleation sites for bubbles to form in carbonated liquid.
Here are up-close pictures of Mentos candies.
The new $100 Bill is an excellent candidate for this tool. Many of its security features are only appreciable if you have a microscope. For example, the tiny security writing along the length of the feather, or the security threads that are thrown in to curb counterfeiting. Also, note that you can clearly see the color changing glitter is lain in different directions on each side. Shine a flashlight at the bill for best results. Don't miss the raised ink on the front of the bill, you can feel it with your finger, but only with a microscope can you recognize the very specific patterns that in the relief.
The color-change glitter effect is from having different colors on each side. The raised/patterned ink shows off the liberty bell.
One of my favorite experiments is to hold it up to a computer screen and see the different pixels that are making the colors. The lens offers an excellent opportunity to study how the primary colors of light are combined to generate new colors. When looking at pixels, I recommend the Google.com logo.
A computer screen seen up-close.
You will be using a computer screen anyway and it is such a familiar sight that students find this investigation highly amusing. Also look at the black cursor with a white background, to learn how white light is made. While you are at google.com you might as well do an image search for specific colors, like pink, or brown and find out how they are made by mixing RGB.
Speaking of mixing colors, take a close look at an image in a text book and see that these pictures are not made from RGB, but rather the primary colors of ink, CYMK. Cyan, yellow, magenta, and black are unequally mixed to form the color desired. For example, cyan and yellow makes green. That they are not red, yellow, and blue, is sometimes a surprise. Note also how messy individual letters look close up.
A CYMK print image of a red car, green bushes, and a blue sky.
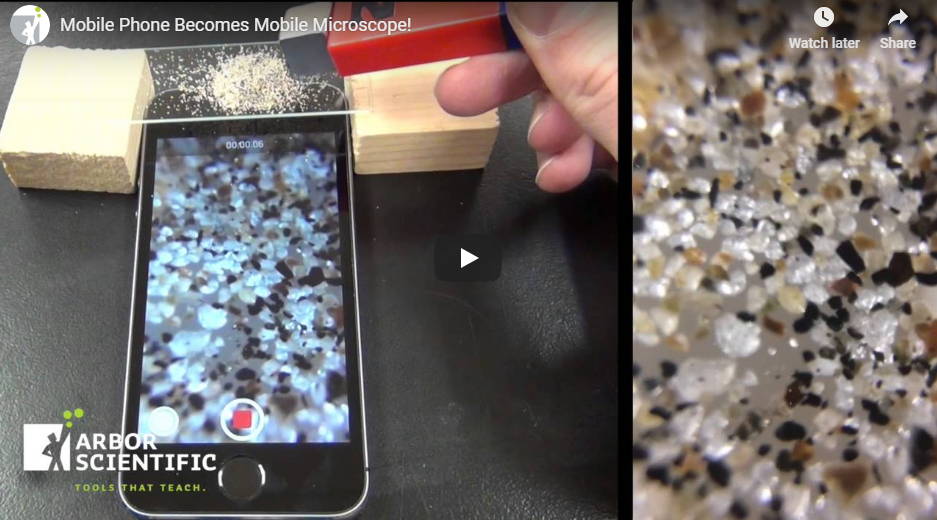
Pretty much any grain or crystal will look very interesting microscopically. Take a closer look at your rock collection or – even easier – just take some condiment packets from your local restaurant.
Of course insects offer a wonderful venue for this lens. Because the camera is mobile, you now can look at and photograph living insects more easily. Nonetheless, I still enjoyed looking at my insect collection with the camera.
A fly from a student's collection gets his close-up
The Physics of the Lens
Using your cell phone as a microscope has advantages beyond just the fact that it helps you make and share videos and pictures. One of the best things is that your camera has an autofocus, which makes it easier to get the image. Also, since the lens is making a virtual image, you do not have to move the object oppositely to the direction you want the image to move (this is a major annoyance when using conventional microscopes).
The lens has a focal length of about 1cm. I found this by projecting a real image of my ceiling lights and by assuming that since the object distance is so much greater than the image distance, that the focal length is the same as the image distance ( 1/f = 1/do + 1/di ).
Our website says that the magnifying power is 15 times. I found this to be true. I first took a picture of an ordinary meter stick without the lens and found that my iPhone's lens had a magnification of 2. Then I took a picture of a ruler with and without the lens, and compared those. Here I found the increase to be a little more than 7 times. (Images must be in focus.) The product of 2 and 7.5 is 15 which is very the same as the advertised value. I am using the definition that magnification is the ratio of the image height to the object height. Since our images are not upside down we have a +15.
Since the lens needs to be sticky to stick to the cellphone, it also is sticky to dust. This is easily washed off however, either by a little water or more conveniently and effectively saliva. The instructions recommend water with a little soap, but water alone is usually sufficient.
Conclusion
I am surprised at how much I have come to like having this little attachment. I have been using it whenever I need to show my students things that are better appreciated through a microscope.
With the advent of every student having a camera in their pocket, it would certainly not be an unjustifiable purchase to buy a class set of these to increase engagement when learning about lenses or any subject that uses microscopes. If you are interested, you should definitely buy one to try it out; you'll be glad you did.
James Lincoln
Tarbut V' Torah High School
Irvine, CA, USA
James Lincoln teaches Physics in Southern California and has won several science video contests and worked on various projects in the past few years. James has consulted on TV's "The Big Bang Theory" and WebTV's "This vs. That" and the UCLA Physics Video Project.
Contact: James@PhysicsVideos.net


